
I noticed a lot of people ask in the AI Horde Discord how to run a worker. I thought it would be useful if the community had a blog post to point people to, and maybe that can be this post. Let’s go!
How to get an AI Horde API key
Be sure to get an AI Horde API key if you don’t have one. You can register here: https://aihorde.net/register. Be sure to protect this API key, put it in your password manager or somewhere else for safe keeping. This API key will be your ticket to all the kudos you can earn.
How to Run a Text Worker (“Scribe”) on Windows
If you’re using Windows, you’re in luck, because running a Horde worker is easier than ever thanks to Koboldcpp, which compiles all the bits and bobs into one executable file for you.
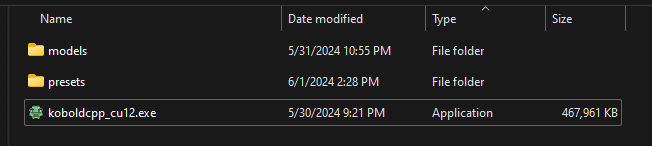
Step 1: Download Koboldcpp
Go to the Koboldcpp Releases page, and grab the executable most relevant to you. This is probably koboldcpp.exe. If you have a newer Nvidia GPU, grab koboldcpp_cu12.exe. Stick this file in a folder somewhere, like D:\koboldcpp\koboldcpp.exe
I like to make a presets and models folder in here, so your folder might end up looking something like this depending on which version of koboldcpp you downloaded.
Step 2: Download a Model
Koboldcpp can run models quantized in the GGUF format. What does that mean in the most basic sense? Koboldcpp can run models that are compressed in a way that allows them to run on lower-end hardware, with some trade-offs (like decreased quality of generations). For example, CohereForAI/c4ai-command-r-v01 requires ~70gb of VRAM in its original form, but a 4-bit quantization (available here) of it only requires ~23gb of VRAM.
We’re going to focus on a model that everyone should be able to run locally, Sao10K/Fimbulvetr-11B-v2, which is a smaller model that really excels at roleplay chat, and there is plenty of demand for it on the horde. It’s a personal favorite of mine as well.
Step 2.a: Find a GGUF version of the model
Google (or use your search engine of choice) “<model name> gguf”, in this case we’ll look for “fimbulvetr-11b-v2 gguf“. Usually the first result going to huggingface.com is what you want. In this case, we’re going to end up on the second result, at mradermacher/Fimbulvetr-11B-v2-GGUF, because it gives us more options in regard to quantization sizes.
Step 2.b: Download a GGUF version of the model
You can see on the model page for that GGUF version, that there is a chart that tells you how “good” the various quants are, but here are some general tips:
- Models hosted on the horde should be Q4 or greater, to ensure best generation quality.
- You should pick the largest quant that looks like it can fit in your GPU’s VRAM.
- If you have a 8gb GPU, get a model under 8gb, etc.
- If you aren’t sure what to try, try Q4_K_S first. You can always download a bigger quant and try it later.
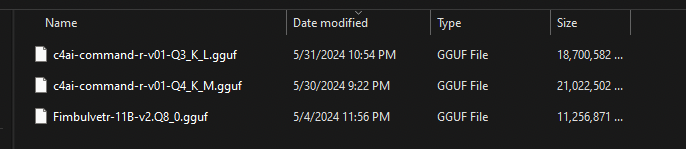
Download the .gguf file into your koboldcpp/models folder. My models folder looks like this:
Step 3: Configure Koboldcpp
Now we’re ready to launch Koboldcpp and start configuring it. The initial Quick Launch screen has all the main information we need to worry about.
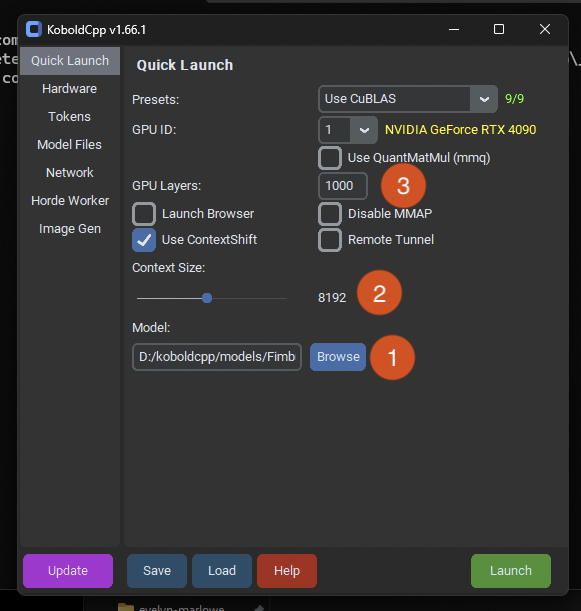
- Hit browse and pick the
.gguffile you downloaded into yourmodelsfolder. - Set the context size you want. I like to have plenty of room for context, so I pick 8192 by default, but if you have less system power you should try 4096 to speed up generation times.
- If you’re certain the model will fit entirely into your VRAM (because you downloaded a model smaller than your available VRAM), set a large number here. If you don’t know if the model will fit into your VRAM, there will be a section below about figuring out layer quantity.

- The model name is very important to get right, as it determines how much kudos you will get for your submitted generations. If you put an incorrect name here, you will get very few kudos. To makes sure you put the right name, check the model whitelist for the name of your model, without any quantization naming attached. In this case, we see that the base model of Sao10K/Fimbulvetr-11B-v2 is in the list. But that isn’t the name we want to put into the “Horde Model Name” slot, we want to identify that the model is being run with koboldcpp, so we put in the model name as “koboldcpp/Fimbulvetr-11B-v2”. Nothing else matters, you do not need to include the quantization level in the name.
- This is where you put your API key so you can receive kudos properly!
- Your worker name should be the same every time you run your worker, regardless of the model being used.
- Save your configuration to a
.kcppsfile so it is easy to reload it later. This is what thepresetsfolder is for, save your configurations in there so you can easily use them later on. ⚠️ Koboldcpp doesn’t save your settings automatically!
Once your configuration is saved, hit Launch!
Step 4: Is it Working?
Once your worker is running, you should end up with a terminal display that shows you what your worker is up to. It looks like this.
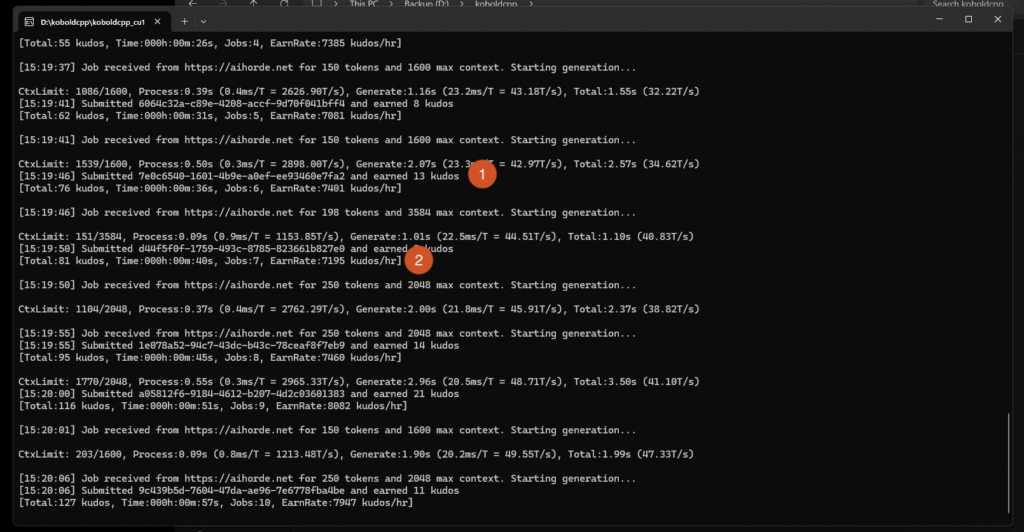
- This is how many kudos you are earning for this specific job. If this number is very low, like 1 or 2 kudos, you likely have your model name configured incorrectly or the model is not whitelisted for the horde. Double check that your model name is correctly entered and that the model is whitelisted.
- This read out shows how many jobs your worker has completed and how many kudos per hour you are making. If you’re not earning several thousand kudos per hour, your worker is likely configured incorrectly or you’ve picked a model you are not able to run at a decent speed.
You can test your worker through the horde by using Kobold Lite. Load up the website and then click on the “AI” button in the top left corner.
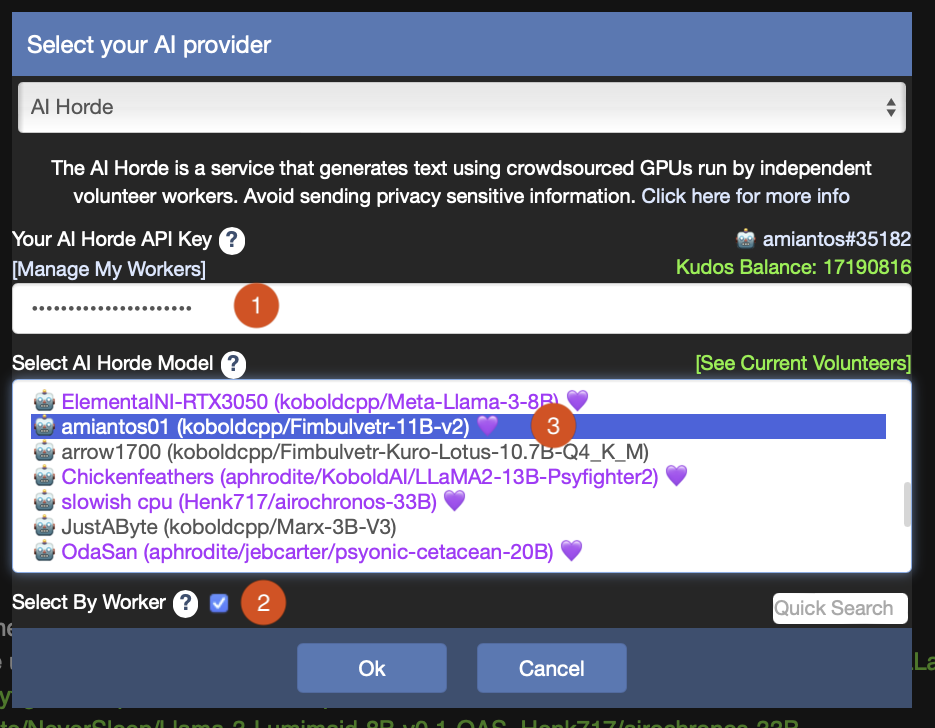
- Put in your AI Horde API key if you haven’t before.
- Check the box “Select By Worker”
- Look for your worker in the model list. If you don’t have a Purple Heart here, it’s just because your worker is not yet “trusted”. More on that later.
Click OK, then pick a desired scenario (KoboldGPT is the easiest for testing, I think) and submit a chat request. You know your worker is running when you get a message back and it shows your worker name and model name in the bottom of the client, like this:

If you ended up here and all looks well, congratulations, your worker is running and racking in the kudos.
Troubleshooting
“Where are my kudos? I’m not getting the right amount of kudos.”
To prevent abuse of the horde by bad actors, when you first start running a worker, half of your earned kudos are held in escrow. After a week or two of running a worker without issue, you’ll become “trusted” and receive all kudos owed to you (the kudos held in escrow plus all future earnings). (By “without issue”, I just mean that your worker is returning proper generations and there is no monkey business happening.)
“What was all that about layers and how can I run models larger than how much VRAM my GPU has?”
When you are configuring Koboldcpp, it asks you how many GPU Layers to use. This can be useful if you want to run a model that is just slightly too big for how much VRAM your card has. But how many layers does each model take up? There is a way to guess this yourself, but I like to just try to load the model in Koboldcpp and see what it says. For example, the 8bit quantization of Fimbulvetr I’m using displays this in the console when loading.
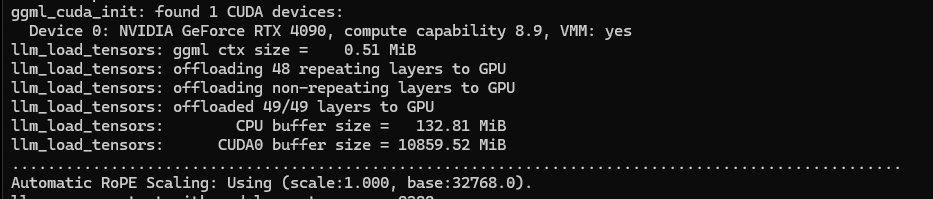
You’ll see it says that this model had 49 layers that it is loading in the GPU memory. If we didn’t have enough memory to store the full model, we could configure Koboldcpp with GPU Layers set to 40, and then it’ll load most of the model to the GPU, and the rest to system memory for the CPU to use. This can be very slow, so it’s recommended to only offload as many layers as needed to run the model at all. The more layers on the GPU, the better!
“I need more help!”
Not a problem at all, there are a lot of people who are willing to help you over on the KoboldAI Discord. There are lots of people far more knowledgable than I am, and if you decide you like running a worker a lot, they can help you level up your hosting game. Remember, this is just the most basic guide, there are more robust methods (like aphrodite) that allow you to run several models at once if you have the hardware capable of doing it. Feel free to ask about that in the Discord.